Why Row Covers Fit a Beautiful Garden
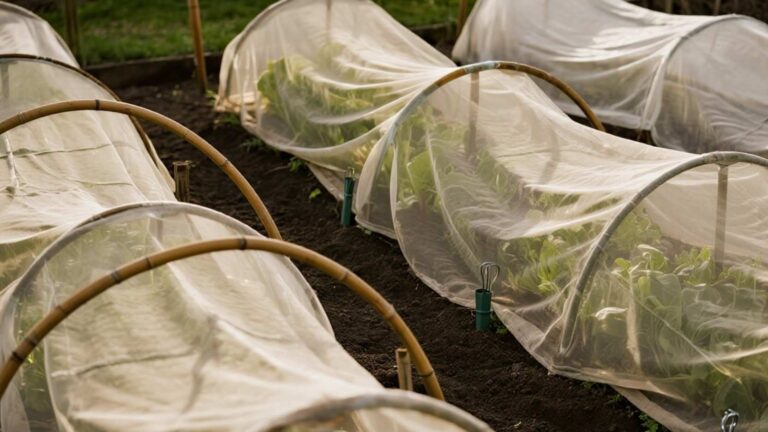
Row covers can be as intentional as a trellis or path, not just a temporary fix. Fine insect mesh acts like a translucent curtain that softens shapes without blocking light. When trimmed cleanly and anchored neatly, it reads “designed,” not “makeshift.” 😊
Mesh also stops common spring pests—flea beetles on brassicas, cabbage moths, and aphids—before they ever start. That means leaves stay photo-ready and harvests stay consistent. Your garden looks calm because prevention replaces emergency treatments. 🛡️
Style Patterns for Beds: Symmetry vs Drift
Symmetry suits formal gardens: mirror your hoop spacing and clip positions from bed to bed. Keep paths equal widths and end the mesh to the same distance beyond each bed edge. The result is a rhythm your eye instantly trusts. 🧭
Drift patterns feel naturalistic: stagger hoop spans slightly and let mesh ends taper gently. Plant in sweeps—kale to cabbage to arugula—so the veil drapes over “waves” of texture. You’ll still be tidy, just more organic in flow. 🍃
Materials & Color Palette that Blend In

Choose bamboo or fiberglass hoops for slim profiles and soft lines. Pair with fine insect mesh (0.8–1.0 mm hole size) in off-white or bone to reduce glare. Matte-black or bronze clips disappear visually better than shiny silver. 🎯
Edge weights matter: canvas sandbags or flat timber battens keep lines straight without looking industrial. Avoid blue tarps or bright plastics that dominate the scene. Muted tones make plants the “pop” while covers recede. 🎨
Hoop Heights Cheat Sheet (Kale/Broccoli/Cauliflower)
Start low to hug warmth: 30–45 cm (12–18 in) hoop height for seedlings and baby transplants. For growing brassicas, upgrade to 60–75 cm (24–30 in) so leaves don’t rub the mesh. Space hoops 90–120 cm (36–48 in) apart to prevent sag. 🔧
Broccoli and cauliflower heads need clearance; aim for 70–80 cm (28–32 in) by week 4–6. Kale is flexible but appreciates 60 cm (24 in) as leaves broaden. Raise the cover by swapping taller hoops rather than stretching fabric tight. 🌤️
Tidy Fasteners & Edges
Use uniform clips every 30–40 cm (12–16 in) along the base for a straight hemline. Bury 3–5 cm (1–2 in) of mesh or pin with U-stakes for a clean, pest-tight seal. Where wind is strong, add a batten at the windward side. 💨
Keep edges parallel to paths: snap a chalk line or use a string guide before placing hoops. Roll extra mesh under once for a neat “hem.” Small habits like these create a polished, magazine-ready look. 🧼
Photo Ideas: Make the Netting a Soft “Veil”

Photograph at golden hour so mesh glows, not glares. Backlighting turns the cover into a luminous veil that flatters foliage. Frame the curve of the hoops as repeating arches for instant elegance. 🌇
Include a human touch: a hand lifting the veil or a basket of first harvests. Shoot at f/2.8–f/4 to blur backgrounds and keep focus on texture and curve. Wipe clips and edges before shooting to avoid visual noise. 🙌
Seasonal Workflow: When to Cover, Vent, Remove
Cover immediately after transplanting to block early pest scouts. On warm days, vent the leeward side in late morning to prevent heat buildup. Re-seal by late afternoon to keep hitchhikers out. ⏱️
Remove the cover once crops are robust or when flowering requires pollinators. For cut-and-come-again greens, re-cover after each harvest flush. Rotate the same system onto the next bed to keep momentum. 🔄
Troubleshooting Aesthetics & Function
If the mesh sags, add one extra hoop or switch to a slightly heavier fabric (e.g., 60–80 g/m²). Wrinkles along edges mean uneven anchoring—reset the hem with a straightedge. Glare? Try bone or taupe mesh and avoid midday photos. 🪄
If pests sneak in, check for gaps at corners and where irrigation lines pass. Use mesh patches or clip-on flaps to seal entry points. Consistent spacing of clips is both prettier and more effective. 🛠️
Prevention-First Philosophy: Less Spray, More Serenity

Row covers work like seatbelts: always on, quietly preventing harm. By keeping insects out, you avoid leaf damage that invites disease and reduces yield. It’s simpler to exclude than to rescue. 🧘
A prevention-first garden is calmer to manage and nicer to photograph. Your plants stay pristine, your schedule stays predictable, and your ecosystem needs fewer interventions. Beauty and function finally pull in the same direction. 🌟
Quick Shopping & Setup Snapshot (at a glance)
Pick bamboo/fiberglass hoops, fine insect mesh (0.8–1.0 mm), matte clips, and canvas sandbags. Space hoops 90–120 cm apart, start at 30–45 cm height, then raise to 60–75 cm as brassicas grow. Keep edges hemmed, lines straight, and colors muted for an intentional look. ✅
Cover at transplant, vent on warm days, and re-secure each evening. Photograph at golden hour for a soft, luxe veil effect. Repeat across beds using symmetry or drift patterns to match your garden’s vibe. 🌗
Bonus: “Style Patterns” Recap
Symmetry: mirrored beds, identical hoop spacing, matched clip intervals, equal path widths. Clean edges and parallel hems create a formal, stately feel. Great for straight hedges and rectilinear paths. 🧱
Drift: staggered hoops, gentle tapers on mesh ends, planting in sweeping blocks. Softens lines and blends covers into foliage. Ideal for cottage or meadow-style plantings. 🌼